My latest animation tools are available on Gumroad.
My older Free tools can be found below :
bhGhost.
This is an animation tool I wrote for Maya that provides a different approach to ghosting/onion-skinning in 3D. I was watching a recording of a live lecture with Jason Ryan (Dreamworks/iAnimate) when a student asked him if he used ghosting when animating in 3D. He mentioned a couple of reasons why he usually doesn't, even though he uses the lightbox feature all the time when animating in 2D. I realised I feel the same way about any 3D ghosting solutions I've tried. One problem is that they slow the scene down usually, and another is that they are not that easy to see in the viewport, usually being a faded version of the mesh or a wireframe of it which doesn't read very clearly. Then the penny dropped for me - 2D animators don't see the fully shaded character in the lightbox when animating, they see only the lines they've drawn, so the spacing is a lot easier to see. So I set about writing a tool that will give an outline of the character rather than a fully shaded one when ghosted. It's also a little different in that the animator just ghosts specific frames rather than having something heavy that's constantly updating in the scene, for my workflow at least this is preferable. I showed this initially in a 30 second video here and was amazed by the amount of response from animators around the world. Many thanks to everyone for their comments and emails about it. Please watch the video above so that you know how best to use it. I hope people find it useful, I know for me it's helping me see the spacing in my animation in a whole new light since I've started using it in my animation workflow. Happy animating! Update 1.05 - 10102012 :
Update 1.06 - 17122012 : I've now added a new function to the tool which makes it much faster when working with multiple characters in a scene. Please watch the video here for more details. Update 1.08 - 080513 : I've added a new function where it will ghost only the keys in a selected range if a controller is selected. Please watch the video here for more details. Update 1.09 - 160114 : Added new 'replace' mode. With this enabled only one ghost exists at a time and each new one replaces the old one. Handy for polishing animation. Update 1.10 - 301114 : Added Create Tracker function - see video here to see how best to use this. Update 1.11 -230415 : Minor tweak to code to suit UI changes in Maya 2016. Update 1.25 -300815 Added alternate colour option and smooth mode. Video demo here. Update 1.26 -171015 Added the ability to ghost only selected parts of a mesh. Video on that here. Update 1.27 -190216 Added 'Hide on Playback' option (Maya 2016+ only). Video on that here. Update 1.28 - 110416 Added '10X' mode for thicker outlines Update 1.29 - 150616 Code tweak to ensure the 'Hide on Playback' check box is enabled when a hide ghosts layer already exists in the Maya scene. Update 1.32 -240817 Bug fix update to stop crashes when using Create Tracker function in Maya 2017/2018 Update 23 May 2017 - I made a new video that demonstrates all current features.. this is the ideal one to start with now - The older video is still online which covers things like installation in more detail here.
Update 1-42 - 03 March 2019 - I've added two new features - attach to camera mode and reduce detail mode. See this video for more details. Updated 1-55 18th December 2019 - new outline thickness settings, new tracker options and improved create shelf button command.
|
||
----------------------------------------------------------------------
bh_timelineMarkers.
This is a MEL tool I wrote for Maya to make it easier to navigate animation scenes. Essentially it allows you to create bookmarks for specific frames in the timeline and quickly jump between them, like the timeline markers in Cinema 4D or After Effects do. You can also store the markers in the scene file and even copy them to a different scene if needed. Please watch the above video to see how to use it effectively. Update 280716 - I've added a small but useful extra function to this - if you hold CTRL while clicking on a marker it will set the timesliders Start range to that frame and if you hold ALT while clicking on a marker it will set the timesliders End range to that frame. To use the script place the MEL file in your Maya>Scripts folder, restart Maya and then enter the following in the command line or script editor : source "bh_timelineMarkers.mel"; You can hightlight and middle-mouse-drag that to a shelf to make a button of it if desired (I included an icon in the zip). |
----------------------------------------------------------------------
bh_handPoseToFK.

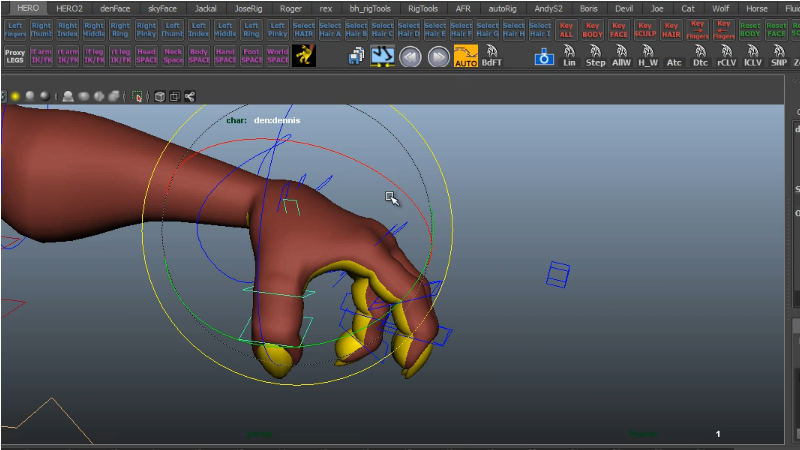
This is a tool I wrote to help speed up my animation workflow with iAnimate character rigs. Several of them have a very useful 'box' control for the hand with attributes like 'fist', 'curl' etc, that allows you to pose the entire hand in addition to the individual FK controllers for each knuckle. This can speed up blocking out the main poses and you can then customize the poses with the individual controllers on top of that. One issue I ran into though, is that when you get to the polishing stage it's a little confusing to work in the graph editor as the fingers are being controlled by two different things.
Here's a short video showing how to install and use the script. It's now completely automatic and will match the poses for an entire animation in one click, but there are a couple of things to be aware of so please watch the video before using it on your shot!
|
----------------------------------------------------------------------
ATOM Info.

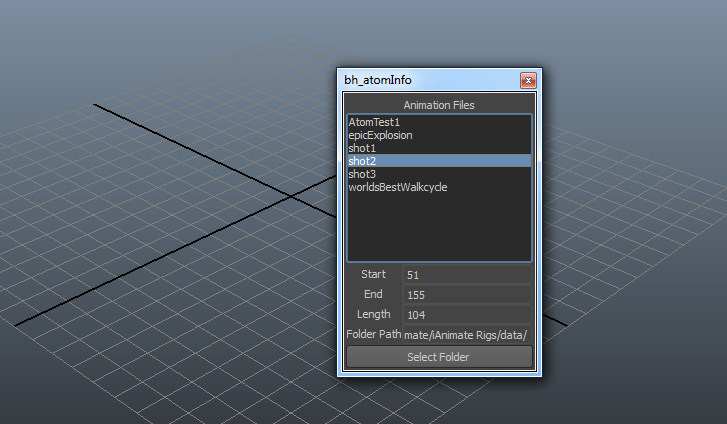
I'm really liking the new ATOM file format in Maya 2013 for animation import/export but one thing that seems akward is keeping track of how long each animation is and what frames they start on. This is a little MEL tool that allows the user to select the folder where their ATOM files are saved and it will load each it finds into the list. Then as each animation in the list is highlighted the start, end and length of the selected animation is displayed. |
----------------------------------------------------------------------
Stagger Animation
A little workflow tool that allows you to quickly stagger the keyframes on multiple selected objects. It uses the selection order to decide how to stagger with user controlable stagger value. |
----------------------------------------------------------------------
Zoom Camera
A little workflow tool that allows you to quickly zoom the camera you are working with. This needs Maya 2011 or newer as it works off the 2D pan and zoom feature. Of course you can do this manually through the attributes editor but I wanted something simple I could leave floating in my UI while working. This video covers installation and a couple of things to watch out for when using it. Update Oct 2012 - added a 'Toggle' checkbox to the GUI which allows you to quickly toggle the zoom without resetting the sliders. |
----------------------------------------------------------------------
All work on this website (C) Brian Horgan 2024. All Rights Reserved.
----------------------------------------------------------------------